I am off for the next two weeks (more or less) so my goal is to check off a bunch of crap on my todo list that has been sitting on there for a while. One of those things that I’ve wanted to do was connect my server on AWS that is hosting Signal-Chief to my house network so that I can forward log data and such to my Splunk instance (I don’t think I posted about it here, but I joined Splunk/Cisco back in June). I want to do this for a couple of reasons.
- I’m a nerd, so why not?
- Having data to play with is never a bad thing.
- I suppose security since I don’t really get onto this server a lot.
I figured there were pretty much two ways I could bring the data in. First option is to just send it across the Internet (my Universal Forwarder will encrypt it) and port forward the data through my home firewall to my indexer inside my home network. Second option is to standup a VPN between home network and my AWS instance so its fully encrypted and I don’t have to take any chances with letting traffic into my home network, even though I would limit it to my AWS instance itself. I decided to go ahead and create a VPN tunnel, and to use WireGuard since I’ve never actually used it before.
To be completely honest, I’m not super familiar with WireGuard so talk all of this with a grain of salt. WireGuard is a fairly new technology compared to OpenVPN. Its primary benefit is actually its lack of features. The thinking is that OpenVPN has gotten so bloated over the years the code base has become huge with makes it difficult at best to maintain and keep secure. Contrast that with WireGuard which has a SUBSTANTALLY smaller code base. This makes it easier to maintain and troubleshoot, and significantly reduces the attack surface open to vulnerabilities. My biggest complaint that I have so far (just based on setting it up) is the fact that I have to do a unique configuration for each client connecting instead of a blanket one that I can do with OpenVPN. Yes, its more work, but also I suppose its more secure that way.
For this, I am configuring my PFSense router as the WireGuard server, and making my Rocky 9 AWS system a client.
PfSense Server Configuration
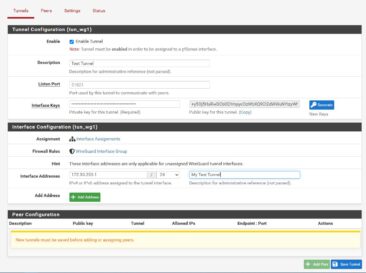
To get started, log into your PFSense and select VPN > WireGuard. On the Settings tab, ensure that Enable WireGuard is check and hit save. On the Tunnels tab, click Add Tunnel. Once you’re in the interface configuration screen start by ensuring that Enable Tunnel is checked. Provide a description and give the interface an IP address (this is the tunnel internal IP address, not anything that has already been used). Click on Generate (new key) to create a new key pair. Press Save Tunnel and the server is ready.
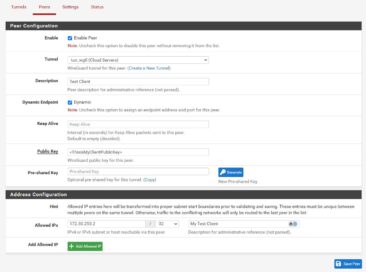
Now we need to add a peer configuration to the server. This has to be done for each client that will be connecting to the server. From the Tunnels tab, press the Add Peer button. NOTE: I’m going to go over this part of the configuration now because it’s done on the server, but you’ll have to wait (or rather go back and forth) with it once the client is configured because we need the client’s public key.).
On the Peers tab, ensure that Enable Peer is checked, and that the tunnel you just created is selected. Enter a Description for the client. Ensure that Dynamic Endpoint is checked. In Public Key, you’ll need to enter the CLIENT’s public key (this is the part you’ll have to come back to after you’ve configured the client system). On the Allowed IPs section, enter the IP address for the client node. I would make sure you set it as the /32 address for the host or this could cause you problems in the future if you have other hosts on the same tunnel. If you have any other networks on the client’s side that need to be reachable to the server, also add them in here. Press Save Peer.
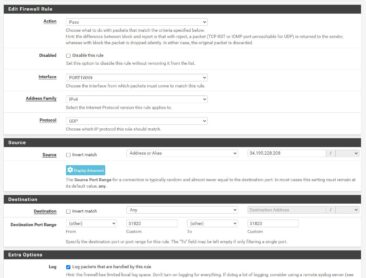
Now we need to create some rules in the firewall itself to allow traffic to get through. By default, you’re firewall is likely blocking inbound WireGuard traffic. Go to Firewall > Rules and click on the tab for your WAN interface. Create a new rule by clicking either of the Add buttons (make sure the rule is before any explicit deny all you may have). Ensure that Action is set to Pass and that the Interface is your WAN interface. Change Protocol to UDP. Under Source, for me, I am setting it to Address or Alias and then the IP address of my web server since its a static IP address. You may need to open it to any address. On Destination set the Destination Port Range to Other and 51820 for both the From and To sections. You may consider selecting Log Packets That Are Handled By This Rule to help with troubleshooting but that’s up to you. Press Save.
Click on the Rules button at the top and then go to the WireGuard interface. Create a corresponding rule for any traffic you want allowed into your network from the client. For me, I just allow all (not best practice obviously but it’s easier) but set it to whatever you need to do and save it.
Client Configuration
For my setup, I configured a Rocky 9 system as the client. The process should be mostly the same on other operating systems although there will be some differences (especially between RHEL and Debian based systems). From the command line, install WireGuard.
sudo dnf install wireguard-tools -y
sudo wg --version
wireguard-tools v1.0.20210914
Now we need to go ahead and create the private and public keys for the client to use. Well create them, update the permissions to limit access, and then view the private and public keys so that we can use them in our configs.
wg genkey | sudo tee /etc/wireguard/client_private.key | wg pubkey | sudo tee /etc/wireguard/client_public.key
sudo chmod 600 /etc/wireguard/client_private.key /etc/wireguard/client_public.key
sudo cat /etc/wireguard/client_private.key /etc/wireguard/client_public.key
Enter the public key (the 2nd key that was printed) back under the Peer configuration on the PFSense. Copy the private key for use in a second on the client configuration. Use your CLI editor of choice (I use VIM) to create/open the configuration file at /etc/wireguard/client.conf.
[Interface]
PrivateKey = <The Private Key You Just Created)
PostUp = ping -c1 <The Tunnel IP Address of the PFSense>
Address = <The Client's IP Address>/24
DNS = 8.8.8.8

[Peer]
PublicKey = <The Public Key of the PFSense Tunnel Interface>
AllowedIPs = <Tunnel Network/24,<Any other Networks You Need to get to on your internal network>
Endpoint = <PFSense IP Address or DDNS Domain Name>:51820
PersistentKeepalive = 15
Some notes about the config:
PrivateKey: This is the private key you just created on the client at /etc/wireguard/client_private.keyPostUP: The internal tunnel IP Address of the Server WireGuard tunnel (this will ping the tunnel to ensure that the connection is up).Address: This is the Client’s internal tunnel IP Address. This has to be in the same subnet as the server’s tunnel.PublicKey: This is the public key of the Server’s Tunnel Interface.AllowedIPs: The Network Address(s) of any networks you want to reach the Client to reach over the tunnel.Endpoint: The Domain Name/IP address and Port of the Peer (Server). This is the publicly routable address, not the tunnel address.
Now we’ll start WireGuard up on the client and make sure it works. Assuming it works, you should see the ping result showing a successful ping. If the ping fails, then WireGuard will undo the changes to the system that it creates. After that, you can use the wg command to verify that the tunnel is fully up.
wg-quick up client
wg
interface: client
  public key: <Public Key>
  private key: (hidden)
  listening port: 46220

peer: <Public Key>
  endpoint: <PFSense WAN Address>:51820
  allowed ips: 172.31.255.0/24, 192.168.66.0/24
  latest handshake: 35 seconds ago
  transfer: 188.52 KiB received, 161.95 KiB sent
  persistent keepalive: every 15 seconds
Now that we know that the config is working, we’ll pull down the tunnel, and then run it as a service so that it will automatically start in the future. Once the service is started, rerun the wg command ensure that the tunnel is up.
wg-quick down client
sudo systemctl start wg-quick@client.service
sudo systemctl enable wg-quick@client.service
wg
Credits
- Interface Config: Troy Ward | CC BY-SA 4.0 International
- Peer Config: Troy Ward | CC BY-SA 4.0 International
- Firewall Config: Troy Ward | CC BY-SA 4.0 International
- WireGuard Logo: Jason A. Donenfeld


